Large Sourdough Sandwich Loaf

Large Sourdough Sandwich Loaf
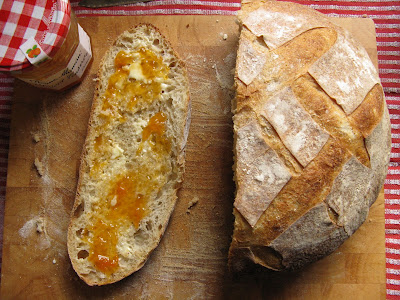
Here's my attempt at a sourdough sandwich loaf... I'm really pleased with it - it's got a lovely crust and the crumb is quite tight, moist and chewy, and it slices perfectly for sandwiches and toast.

This is briefly how I made it - please refer to earlier sourdough loaf posts for step-by-step photos and details of techniques:

Ingredients:

For the sponge:
  • 90-100 grams ripe 100% hydration starter (N.B. Remember to keep 10 grams of your starter back to refresh as your ongoing starter)
  • 375 grams strong white bread flour (I used Carr's Strong White Bread Flour)
  • 500 grams filtered tap water (approx. 60% hydration loaf)
For the loaf:
  • 450 grams strong white bread flour or seeded/granary flour (I used Allinson's Seed & Grain Bread Flour)
  • 15 grams milled sea salt

This recipe generates approx. 1.350 kg of dough and approx 1.3 kg loaf.


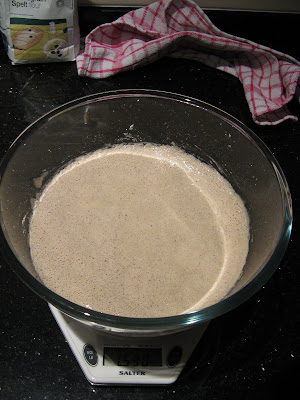
I put the ingredients together for the sponge in the evening and left it covered with a tea towel at room temperature overnight.


The next morning I added the remaining flour and the salt and worked the dough for 10 min.  


The dough was left to ferment at room temperature for 2 hours, with a fold after the first hour.


It was then shaped into a batard and placed seam-side down into a buttered 1 kg/2 lb loaf tin. The anodised tin by Mermaid, (measuring 24 cm L x 13 cm W x 8 cm H) is particularly good, although it needs seasoning before first use otherwise the loaf will stick.

The dough was then left to prove at room temperature (quite a warm day) for about 4 and a half hours (until double in size with some spring-back when the dough is prodded).  


I thought I'd try a cold-oven start for the baking - I placed hot water in a tray at the bottom of the oven (to generate some steam whilst the crust was forming) and put the loaf tin in the cold oven on the middle shelf.  

N.B. this is using a fan-assisted electric oven:


It took about 15 min for the oven to reach 200 degrees C, during which time the loaf had risen quite a lot - the theory is that a cold-oven start promotes greater oven-spring.


When the oven had reached 250 degrees C 5 min later, I rotated the loaf 180 degrees (to even the browning).  

Turning the temperature down to 200 degrees C 5 min later, the loaf was left to bake for a further 10 min after which the oven was turn off.  

The loaf was removed from the oven 5 min later, promptly removed from the tin and left to cool on a wire rack.


To summarize:


00:00 cold oven with hot water in tray
00:15 reached 200 degrees C
00:20 reached 250 degrees C, rotated loaf 180 degrees
00:25 temp reduced to 200 degrees C
00:35 oven turned off, loaf left in
00:40 loaf removed from oven and tin, and left to cool...


Delicious!


Spelt Sourdough Loaf

White Spelt Sourdough Loaf


Spelt flour is milled from the triticum speltum grain, an ancient relative of modern wheat widely grown by the Romans.

Spelt flour contains gluten but it has a different molecular makeup to that of hybridised wheat varieties, resulting in bread that is reportedly easier to digest. 

People with wheat intolerance often find they can tolerate bread made from spelt flour.  However, as spelt does contain gluten, it is unsuitable for coeliacs and those with a gluten allergy. 

Baker, Tom Herbert, of Hobbs House Bakery Bristol, chose to use spelt flour in his Search of the Perfect Loaf.  

Tom's quest resulted in the design of a huge award-winning 2 kilo white spelt sourdough loaf made using his family's 55 year old sourdough starter, organic spelt flour from Somerset, Cornish sea salt and Cotswold spring water.  Tom named it 'Shepherd's Loaf'; I've yet to try it, but at £21 a loaf I'm wondering if I can have a crack at making something like it.

My experience of baking with spelt flour is until now fairly limited. I have in the past made a regular yeasted loaf using 100% wholegrain spelt flour which, although tasty, was very dense and heavy.  And I've occasionally added 50 grams or so of spelt flour to make my regular Sourdough Loaf and it has made a tasty loaf.  


From research and blog comments I'm aware that spelt flour can make a slacker dough that can be a bit tricky to work with.  The big question mark is around the hydration level for the dough, as too much water would make a really slack dough that does not retain its shape, and too little water would make a dense and heavy loaf...


My first attempt using 550 grams of 100% wholegrain spelt flour, 315 grams of water and 11.5 grams of salt resulted in a fairly heavy loaf which was a touch too salty.

First Attempt - 100% Wholegrain Spelt Sourdough loaf

I decided to use white spelt flour in the hope it would make a lighter loaf.  Unable to source white spelt flour locally, I opted for a rather painstaking method of refining (boulting) some wholegrain spelt flour, using a jam strainer to separate the spelt bran from the flour:


'White' Spelt Flour and Spelt Bran
It worked in that I got a lighter refined flour but if you can source white spelt flour it's preferable to sieving wholegrain!


Making the Sponge:


Starter and 250 grams of Spelt Flour
To 95-100 grams of ripe starter add 250 grams of 'white' spelt flour


Starter, Spelt Flour and Water
To the flour and starter I added 320 grams of water, making this a 58% hydration loaf, hopefully moist enough but not too slack to handle...

 
Fermented Sponge
I left the sponge to ferment during the day for about 8 hours.


300 grams of the 'white' spelt flour added to the fermented sponge and 10 grams of sea salt...


Worked Spelt Dough


The dough is definitely slacker than that of regular wheat flour.  This dough was worked for about 10 minutes....


Spelt Dough Left to Ferment
... and then left to ferment for about 4 hours, with 2 light folds in-between.


Spelt Dough, Fermented
The fermented spelt dough was rolled into a ball and placed in a well-floured (rice flour) banneton proving basket...


... and left in the fridge overnight to prove slowly.


Spelt Dough Proven Overnight in Fridge

The oven was preheated to 250 degrees centigrade and a roasting tin placed on the bottom shelf to which boiling water was added when the oven reached temperature (to create steam for a good crust).

With the oven preheated, a baking sheet was given a light covering of fine semolina and the spelt dough tipped onto the tray...


... and then slashed quickly with a lame...


The spelt dough, being quite slack, quickly spreads out on the tray so it needs to be slashed and put in the oven speedily.


The dough was baked as follows:

10 minutes at 250 degrees centigrade
Loaf rotated 180 degrees to even browning
Further 5 minutes at 250 degrees
5 minutes at 200 degrees
5 minutes with the oven turned off
10 minutes with the oven door ajar


Bread then left to cool completely on a cooling rack:

White Spelt Sourdough Loaf
Good Crust and Crumb
The resulting 'White' Spelt Sourdough Loaf is a decent loaf with a good crumb and crust.... The flavour of spelt flour is unique, a bit nutty... it works well with the sour flavours.

The loaf was smaller and denser than my regular sourdough loaf but not as heavy as a 100% wholemeal spelt loaf.  Definitely worth a try, especially if you can source already refined white spelt flour.


Sourdough Loaf - Stage 3

Stage 3 - Bake the Loaf


Loaf has doubled in size following overnight retardation in fridge followed by about 2 hours proving at room temperature.


To bake the loaf, preheat the oven to 250C/ gas mark 9.  Place a roasting tin on the bottom of the oven and fill with about a pint of boiling water just before you put the loaf in - this creates steam in the oven which helps develop a nice crust.  


Dust a baking tray with fine semolina or flour to prevent the loaf from sticking to the tray.  I use a Mermaid anodised baking sheet as it does not warp at high temperatures, meaning the bread stays straight on the tray!  It also conducts heat rapidly and hence gets hot soon after it's put in the oven, baking the dough from underneath.


Set up a baker's lame to score the loaf, or use a very sharp serrated knife.  Take extra care using razor blades!


This Mure and Peyrot 'Bordelaise' grignette or lame is safer to use as it houses the razor blade securely and it has a protective cap for storing the lame.

When the oven has reached temperature add hot water to the roasting tin.  Then gently tip the loaf out of the brotform onto the baking tray.  It should come out easily and not rip the loaf's 'skin'.


Quickly and confidently score the loaf using a lame or knife.  Try not to hesitate when cutting as it could drag the loaf's skin.  

Scores are both functional and aesthetic.  Scoring the loaf allows the loaf to expand during baking and helps minimize the loaf bulging and bursting open undesirably.  They also enhance the appearance of the baked loaf, and can act as a 'baker's signature'.  Traditionally, they were used to identify a family's loaf when given to the local baker to bake.


Straight after scoring the loaf, place the loaf into the hot oven.  

After 10 min reduce the heat to 200C/ gas mark 6, rotate the loaf 180 degrees if possible to even out the baking, and bake for a further 5 minutes. 

Turn the oven off and bake for a further 5 minutes. 

Leave the loaf in the oven for a further 10 minutes with the oven door ajar. 

It should look nicely browned and sound hollow when you tap it's base. 

If you want a browner more crusty loaf then bake for 5 min longer before reducing the temp to 200C.

Place the loaf on a cooling rack and cool completely before eating. 

Enjoy your sourdough loaf!  If you have any left after a couple of days it makes delicious toast.


Same loaf recipe using a 1kg linen-lined wicker banneton for proving the loaf: